How to change the colors of windows 10 elements? Step by step guide
Windows 10 is characterized by being an operating system that allows a large number of adjustments in its system, this is how its users can customize a large number of elements in a very simple and fast way. In the case of W10, it is possible to modify elements such as the task bar, the color of the window, the color of the home screen, the title bar, among many others.
It is also important to mention that not all the elements of the operating system are completely customizable, so only some of them can be modified and customized to your liking . Which will help you to have greater comfort when using your equipment.
That is why here we are going to explain what are the main steps to modify the colors of the two most important elements of W10, such as the colors of the window and the colors of the home screen, this will help you to give it a more personalized touch to your PC, for this follow in detail everything that we will explain in the post.
Steps to change the color of the windows on your Windows 10 PC and give it your custom touch
If you want to start customizing your computer to your liking, the best way to do it is by starting to change the accent color of the system or what is also known as Windows windows . In general, these windows are always white so in many cases it is necessary to add a color to make them much more fun and lively .
That is why here we are going to explain how to change this . Keep in mind that this process can be a bit complex the first time, to do this, follow each of the steps in detail that we are going to explain below:
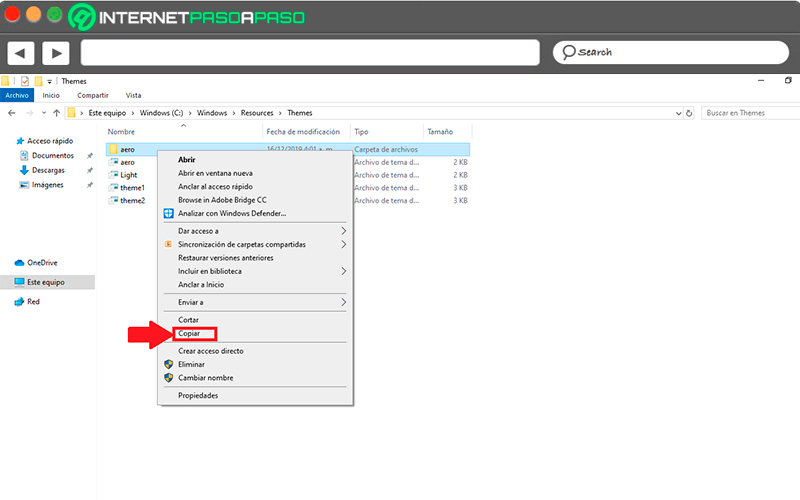
- To begin with this process, the first thing to do will be to enter the file explorer and go to the path: C: \ Windows \ Resources \ Themes
- There you will see several folders on the screen, in this case you must select “aero” and copy it by pressing the key combination “Ctrl + C” or simply by right-clicking on it and select copy.
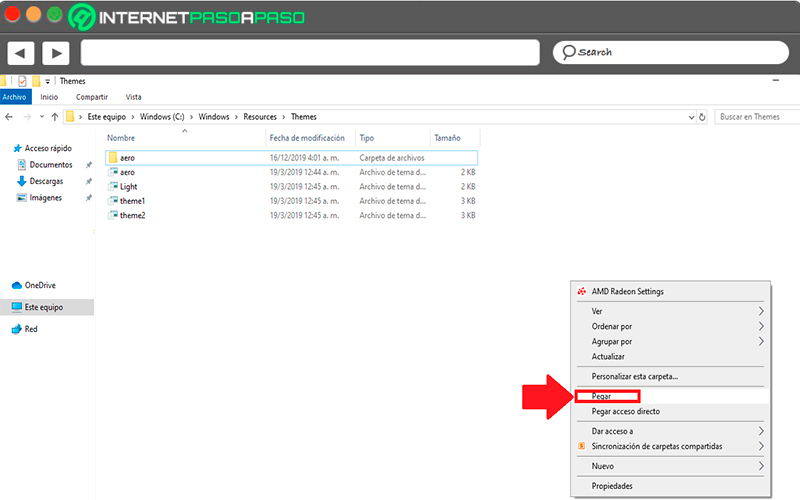
- Now the folder must be pasted again in the same directory where we are located, to do this, click on a blank part of the window and press “Ctrl + V” or right-click and select paste .
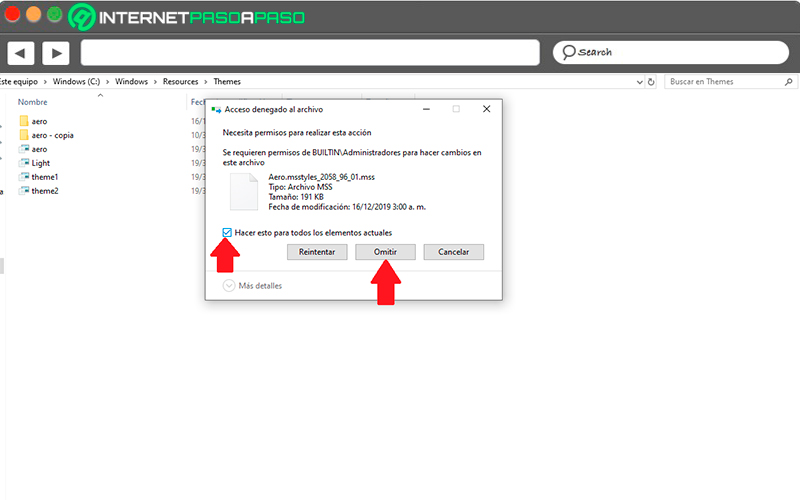
- Here you will see a warning box where you will select “Continue”.
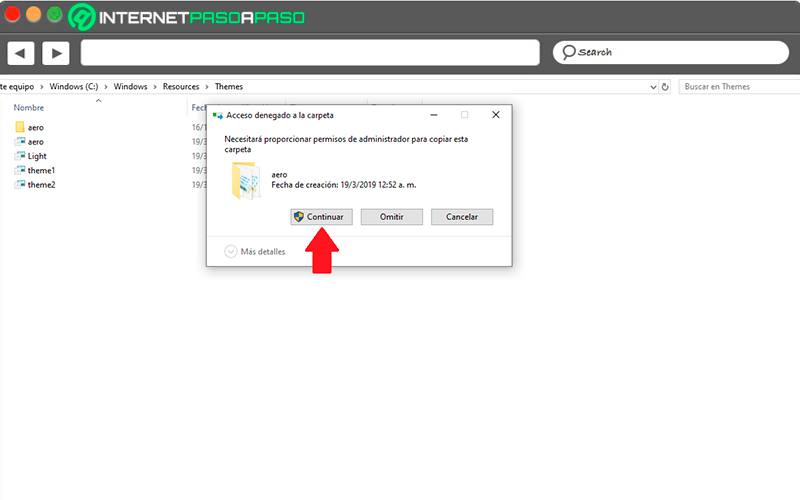
- Then a new window will appear where it will ask you for permissions to be able to complete this action. In this case, check the “Do this for all current items” box and then click on the “Skip” button .
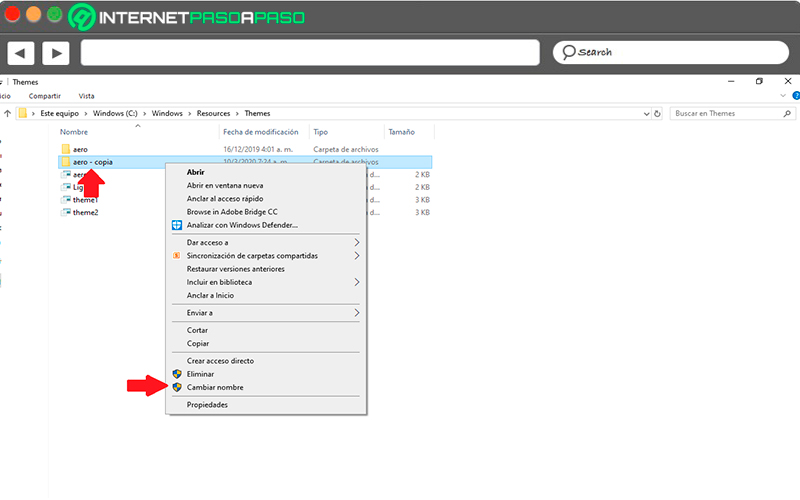
- Once this is done, you will notice that a new folder will have been created that will appear with the name “aero – copy”. In this case, it is best to change the name of said folder to another that is easier to handle, in this case it will be changed to “Color”.
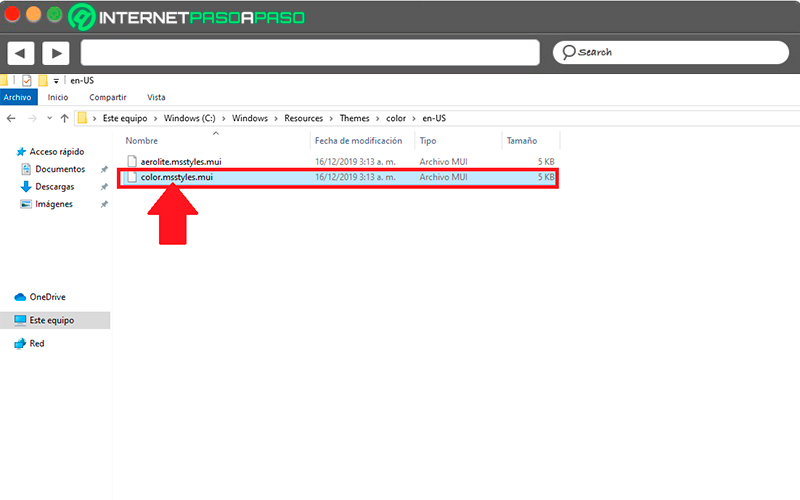
- The next thing will be to access the “color” folder and there should appear a file called “aero.msstyles” or in that case only “aero” if the explorer is configured not to show the file extensions .
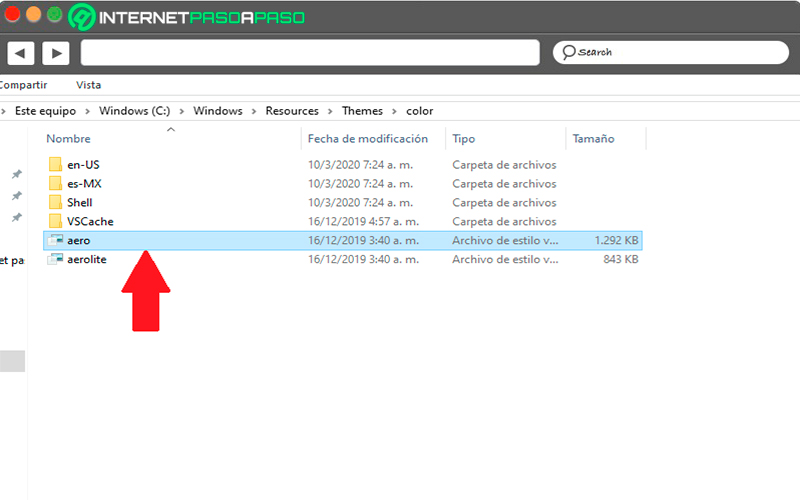
- Here you must select this folder and change the name to “color.msstyles” or just “color” in case you have hidden file extensions. Here a warning box will appear in which you must choose “Yes”.
- The next thing will be to enter the folder “en – US” located in the same folder, usually, this appears first.
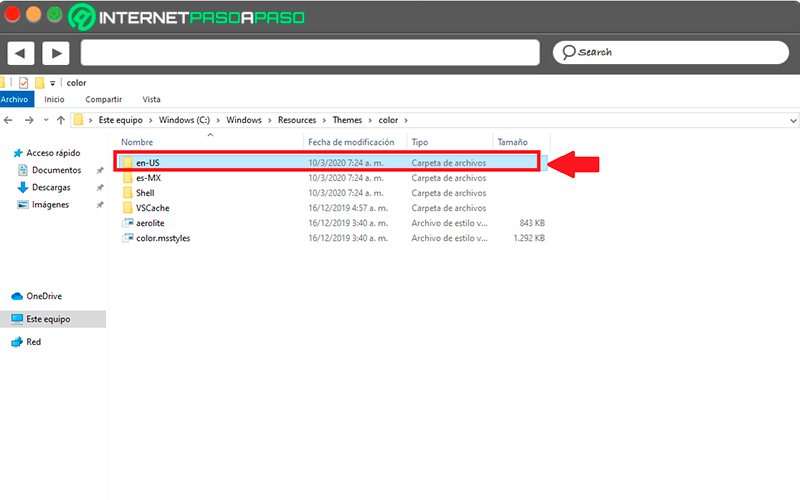
- Within this folder “en – US” you must select the file “Aero.msstyles.mui” and change the name to “Color.msstyles.mui”, here a Windows warning may also appear , in this case select “Continue”.
- When you have done all this, the next thing to do is go back to the address C: \ Windows \ Resources \ Themes. There you will find a file with the name “aero.theme”, you must copy and paste it on the Windows desktop.
- Once copied to the desktop you must change the name of the file to “Color.theme”.
- Then you must select said icon with a right click and there you choose the option “Open with”.
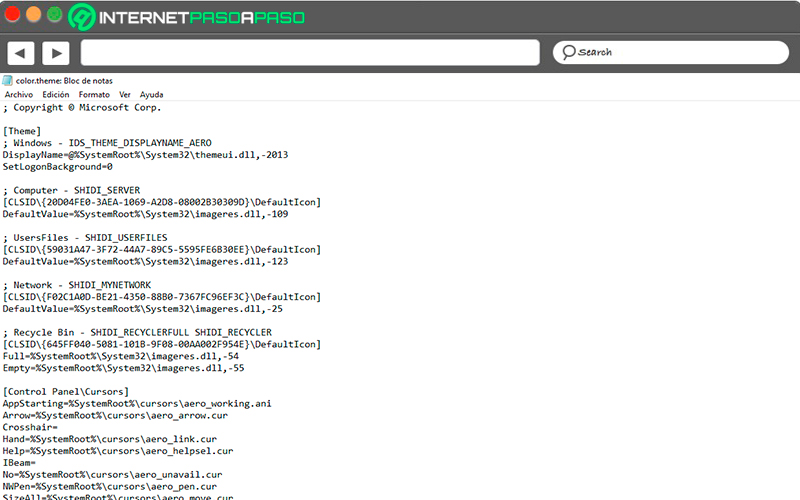
- Here a new window will appear where you will be asked which program you want to open the file with . In this case you must select the option “Notepad”, if it does not appear you must select the option “More applications” to search for the notepad.
- When you open the file you should see a window like the following:
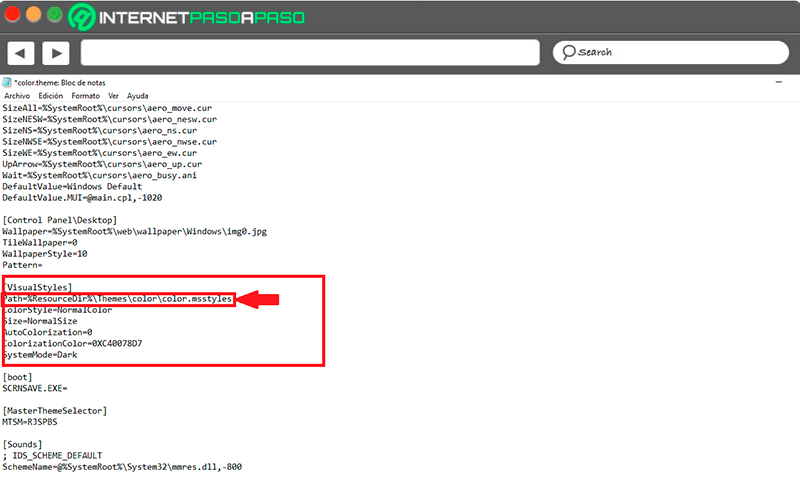
- Now you must scroll the window down until you get to the “VisualStyles” section
- Within the “VisualStyles” section you must select the first line Path =% ResourceDir% \ Themes \ Aero \ Aero.msstyles and you will replace it with the following line Path =% ResourceDir% \ Themes \ color \ color.msstyles . Once this is done, the next thing will be to close the notepad and save the changes .
- Now the following will be to cut the theme file located on the Windows desktop, for this you must select it and press the “CTRL + X” keys and you will paste it into the C: \ Windows \ Resources \ Themes folder . Here you may also see a warning box where you must select “Continue”.

- Here you must double click on the “Color.theme” file to archive the new theme.
- The screen will show you a “Waiting” message which will last only a few seconds, and then the title bar of the window will use the accent color of W10. The wallpaper is also likely to change to the W10 default image.
- Automatically double-clicking on said folder will open the Windows themes configuration window . Here you will be able to select the accent color you want to do so, you must select the color item located on the left side of your screen and there select the “Automatically choose a background accent color” box.
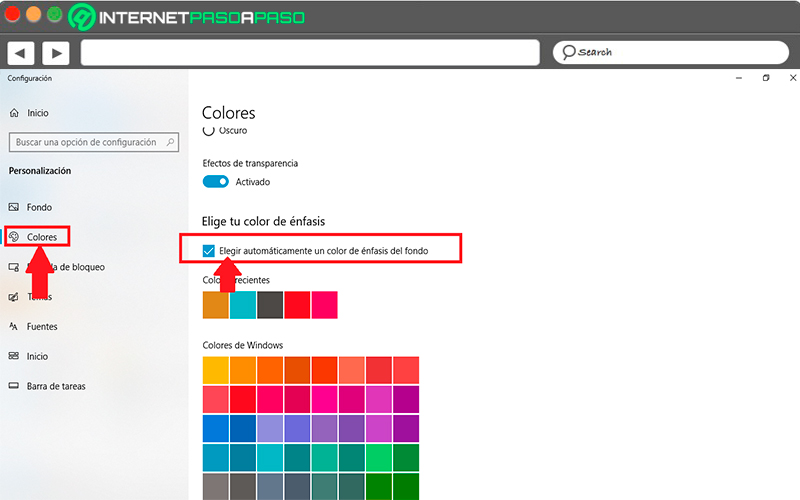
- At this point you must choose the color that you want to be displayed and at the bottom of the window you can check the boxes that appear there in case you want the color to be displayed in those elements mentioned there .
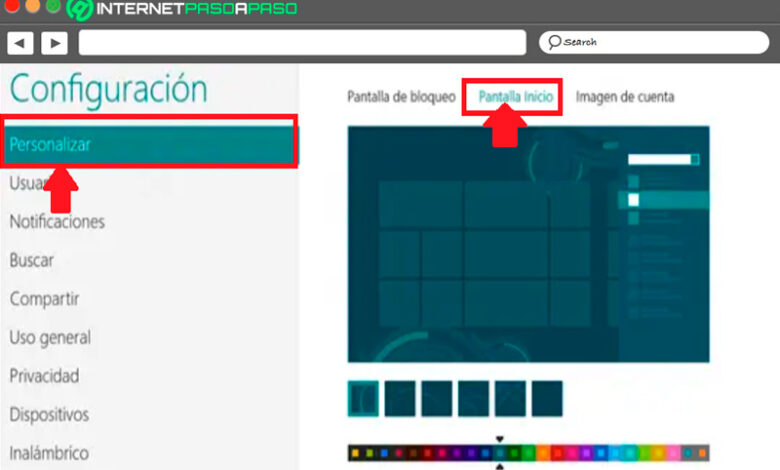
Change the color of the start screen of your Windows 10 PC easily and quickly
One of the most common Windows elements that you can change the color of is the start screen, in general, this usually has a color already defined and is the same that is installed during the installation of W10. However, and luckily for the user, this can be changed in a very simple and easy way, for this you must follow the steps that we will explain below:
- The first thing to do will be to press the “Windows + C” key and then click on “Settings”, there you must “Change the computer settings”.
- The next thing will be to click on “Customize” and then on “Home screen”.
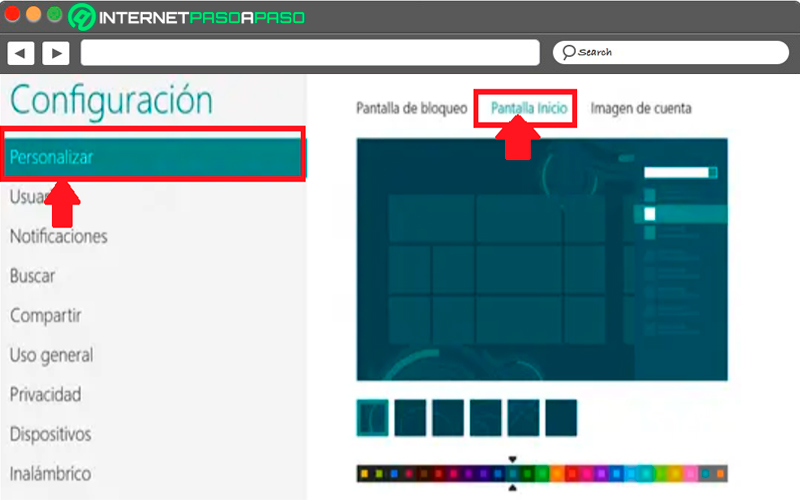
- Here you will see all the available colors that you can use to place it on your home screen. Keep in mind that the color change is done instantly. You can also change the color of the account image and lock screen through this method.