Add to watermark to your desktop to always have it in view
Windows 10 is a highly functional and customizable operating system, something that Microsoft does not stop trying to demonstrate over time and versions. In fact, we have at our disposal a huge number of functions and features that we can adapt to our needs.
This will allow us to work in a much more comfortable and personal way with something that we spend many hours a day with. As many of you will already know first-hand, sometimes we spend a good part of the day sitting in front of the PC using the Redmond system, so it is preferable to customize it. This is something that in these times we can carry it out both on a functional and aesthetic level.
There are several elements that we can use for all this, both integrated into the system itself, and from third parties. This is the case that we are going to talk about precisely in these same lines. Specifically, we are going to show you how to integrate a watermark in your Windows 10 windows.
To begin with, in case you don’t know, as a general rule, watermarks are a more than acceptable way to protect your own graphic content. In this way, the use of these by third parties will be much more complicated, since those photos are marked with our signature. Say that these elements are often used in images, although we can also see them in videos.

In this way, if we usually record or edit our own videos, it is most likely that the editor we use has the option of adding one of these brands. Be that as it may, in the event that you want to use a custom watermark to a screenshot, desktop video, or any other Windows 10 window, you can use this solution.
Add a watermark to any Windows 10 window
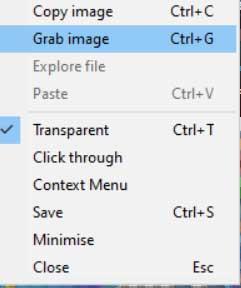
In this way and in a few seconds, we can add a watermark to the Windows screen with the application called SceenDragon. This is a free program that you can download from here very easily. Therefore, the first thing we must do for all this is to select the image that we want to use as a watermark on the screen. Say that this can be a PNG or a JPEG, but if what we want is to use a transparency with a logo, the best is a PNG with supported transparency.
After this, we download and run the aforementioned ScreenDragon application , so it will start up. Instantly on the screen we will see that a transparent dragon image appears on the screen. Thus, wherever we are in Windows 10, it will always be visible acting as a watermark. But of course, if we want to use any other, we just have to drag and drop the corresponding photo or logo on the dragon, and it will be changed.

In addition, we can place this watermark where we want by just dragging it. At the same time, to change its size, just press the Shift key and move the central mouse wheel. We will do the same but with the CTRL key, to change the level of transparency of the image.