Configuration manual to do SSH Tunneling with WinSCP in Windows

When we want to connect to a remote server that is only accessible through the local network (LAN), one of the most used techniques is using an SSH tunnel against a server that is accessible through the Internet. Performing the SSH Tunneling technique, or also known as “SSH tunnel”, we will be able to connect at first to the accessible SSH server, to later “jump” to the other server that is only accessible through the local network. This SSH tunnel would also serve the purpose of browsing the Internet safely, if we connect to wireless networks that are not trusted such as the WiFi networks of hotels, airports, etc.
Let’s imagine that we have an SSH server located in the router itself or in a server on the LAN, in this second case, we need to do the popular “port forwarding” or “Port forwarding” on the router, because normally we will be behind the NAT in our home or company. Once we have connected to the router’s SSH server, or to a server with the SSH port open (it does not matter if it is the default port, 22, or any other, the important thing is that it is accessible through the Internet) , we can connect to the second SSH server that at first is only accessible through the LAN. This will allow us to access the SCP or SFTP server based on SSH indirectly.
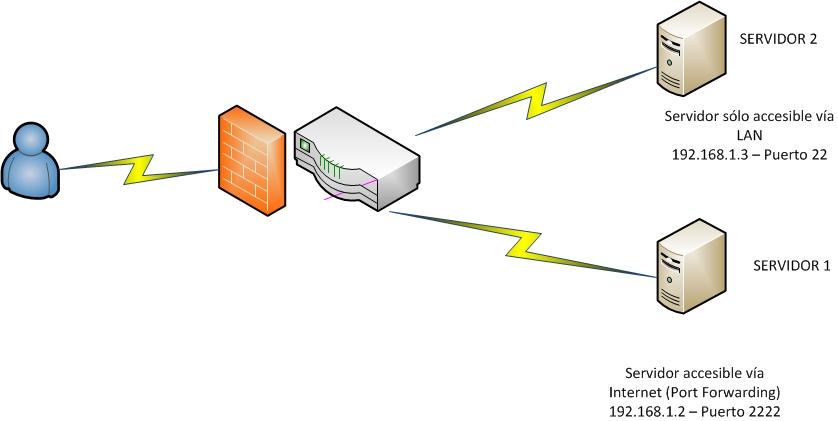
In the following diagram you can see how this network would be installed that we are commenting on:
- The user tries to connect to SERVER 2 (IP: 192.168.1.3 and port 22 open locally). This connection cannot be made because we do not have an open port to this server, that is, it can only be accessed via LAN. If this server 2 has a firewall preventing any connection except the IP connections of the local network, we could also connect.
- Using SERVER 1, which does have Internet access, and to which we can connect via SSH because the router has an open port, and the server 1’s own firewall allows it, we will establish an SSH tunnel to later connect to SERVER 2 as if it were accessible from the Internet. Instead of doing everything in one connection, we will use two SSH connections.
This architecture could also occur if the router incorporates an SSH server, in this case we would not need SERVER 1 as a “gateway”, because the router itself will act as a “gateway” as it is within the local network of the same server 2 to which we want to connect .
To carry out this SSH Tunneling technique, we are going to use a Windows program called WinSCP, although we could also make use of the popular Putty to do the same, but you already have a complete tutorial on RedesZone about this. An important detail is that Putty has more advanced options, such as, for example, several SSH jumps until we reach our goal, WinSCP only allows a single jump, but it will serve us for the vast majority of cases where we will only need to “pivot” only one time and not several.
The first thing we have to do is download WinSCP from the official website, this software is completely free and has a very friendly graphical user interface. A very important detail is that the WinSCP language can be set in English and also in Spanish. We have put it in Spanish so that you can see how easy it is to configure a new SSH / SFTP / FTP server with the program, and how to do SSH Tunneling easily.

Other characteristics of this program is that it will allow us to transfer files in a totally graphical way through SFTP and SCP, making it a very good alternative to the typical terminal commands.
In the main menu we can see all the profiles for «Login» that we have saved previously, we can use different protocols such as SFTP, SCP, FTP, WebDAV and Amazon S3. Here we will have to enter the IP address (the private IP address of server 2 in the scheme) as well as the port, and also the authentication with username / password or with SSH keys. In order to perform SSH Tunneling and connect to a remote server, we must click on « Advanced … » to have access to additional configuration options.

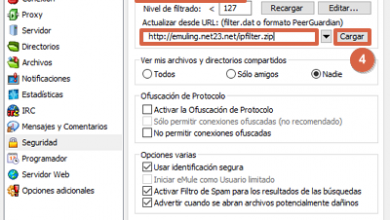
In the ” Connection / Tunnel ” section we will have to configure access to the reachable SSH server, that is, to SERVER 1 in our network architecture. We must enter the public IP address of the remote server as well as the port, username and password. WinSCP allows the connection through an RSA / DSA private key, so we will also have this option available.
Note: If we are connecting to SERVER 1 and it acts as a gateway, we must enter a private IP, that of the gateway itself.
Once we have entered the data, we must click on “Accept” to use this connection later.

Once we have filled in the above, in the “Sessions” section we double click on the profile that we have previously saved to load it as a first hop connection. In the session screen we will enter the IP address, port and access credentials to SERVER 2. When making a connection through SERVER 1, we will be able to put a private address without problems, that is, we will be able to put 192.168.1.3 that corresponds to SERVER 2 within the local network that we have accessed.
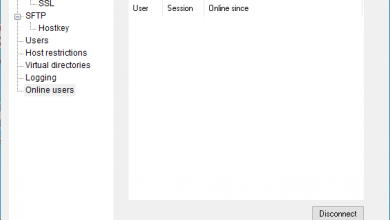
Once everything has been filled in, click on “Connect” and we will connect to SERVER 2 through the SSH connection of SERVER 1. In the following screen shot of the connection log, the following aspects can be verified:
- We open the tunnel and authenticate correctly in the SSH server of SERVER 1.
- Once the tunnel to SERVER 1 is established, we connect with SERVICE 2, which in the case of the example has a private IP address of 10.10.2.14 but which could be 192.168.1.3 of SERVER 2 perfectly. As you can see, we have used a private IP since once the tunnel is created it is as if we were in the local network itself.

So far we have come with our manual on how to do SSH Tunneling with WinSCP to access remote servers that would not be accessible through the Internet, but that are accessible through the local network itself. This technique is widely used because it will allow us to “pivot” on an administration server that is strongly protected, and later connect to internal servers of the organization easily and quickly, this is commonly used in companies to protect the entire internal infrastructure, always ensuring that the server that is exposed incorporates everything necessary to have maximum security such as firewall, IDS / IPS, a complete logging system to see and detect any event related to security, etc.