How to easily create and draw a star shape in InDesign?
Getting a multi-pointed polygon, like a star in InDesign, can be really straightforward, just a few clicks and keystrokes and you’re good to go. InDesign is an excellent tool to obtain web pages and it can become one of your best options to achieve what you want for your page. With this tool you can make book covers .
How to create a star in InDesign?
Although normally this program is only used to position and organize elements on web pages. But it is known to few that this tool is capable of achieving some drawings. Of course, you should not expect great works of digital art like those that can be created with Photoshop or Illustrator. But if some quick drawings for your documents.
First of all, enter InDesign and open the file you want to edit, now, in the toolbar, locate the option “Polygon “. In case it is not visible, you must click on “Rectangle ” or “Circle ” until the tools appear, there you will see the polygon.
To draw, you must click and begin to shape it, but do not release the click, with the other hand, press “Space ” and “Up Arrow”, with this you increase the tips.
In case you place more than necessary, you can use the same combination, but pressing the “Down Arrow ” key . Once, you have the stars you want, you just have to release the click, so the star will have been created easily, but there are still other methods.
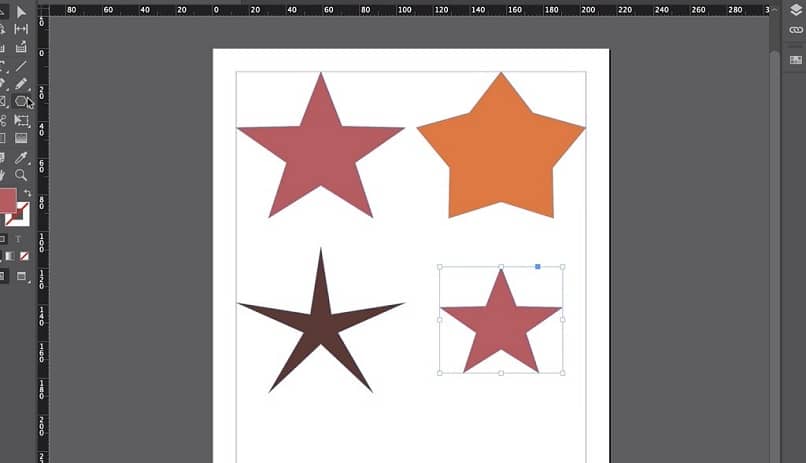
Create a star in InDesign with default look
Based on what was explained above, making a predesigned star can be a breeze. It’s a matter of just a few clicks and voila, a perfect star. First, you must have the “ Polygon ” tool in the toolbar, once you have it, you must double click with the left button.
A box will be displayed where you will be asked for two data, “Number of sides ” and “Star insertions”. In the first, put the number of tips and in the second the percentage.
It only remains that you draw your star and give it the characteristics that work best for you, size, color and other aspects in relation to the document and its location in it. Ready, repeat the process if you want to create stars with more or less points, you can change the data as many times as you prefer, there is no problem.
In addition to working with predesigned shapes, Adobe InDesign has the pen tool with which you can make your own freehand drawings and creations.
Why make a star in InDesign?
Many times, it is necessary to have a quick tool to cover a hole within the design of a page or a document, geometric figures are of great help. The stars always combine very well to highlight an aspect or make it look much more striking. Something that can benefit a lot if it is an important piece of information.
On the other hand, creating interactive documents, e-books, prototyping for websites and much more, a star will always have a place. Doing it in InDesign is something in a way, simple, because it is an easy way and there are enough tools to do it quickly.
![]()
In this way, thinking of making a star or a polygon with more points, such as those necessary to represent explosions, are the main explanations. Also, considering opening another Adobe service, like Illustrator or Photoshop, just to make a star and then import it is too much work for the fun of it.
Whichever way you want to believe, Adobe InDesign allows you to insert an image or text into it and in this way make your design more creative and eye-catching.
Is it advisable to do this for your files?
Really, if you just need a quick plugin or background for a more prominent element, it is recommended that you use InDesign to avoid complications. On the other hand, being a tool that allows you to create, you probably have the possibility of obtaining some additional benefits by creating the star with this program.
Adobe InDesign is a program with multiple tools to create and design, this program also allows you to work on editing and spell checking texts .